GeoPandas. Reading and writing files

GeoPandas can read almost any vector-based spatial data format including ESRI shapefile, GeoJSON files and more using the geopandas.read_file() command

GeoPandas can read almost any vector-based spatial data format including ESRI shapefile, GeoJSON files and more using the geopandas.read_file() command
This post walks through the steps I followed to build a web-based map using Python, Folium, and GeoPandas — from handling shapefiles to adding custom tooltips, interactive toggles, and responsive feedback using JavaScript libraries like AlertifyJS.
In this tutorial, we’ll explore how to create and visualize GeoJSON data, a popular open-source format for representing geographic data, using geojson.io and Folium in Python.
…the geodatasets package. This new package, separated from the main GeoPandas library, focuses on access to and management of spatial datasets. We’ll walk you through installing geodatasets and demonstrate how it complements GeoPandas in handling geospatial information.
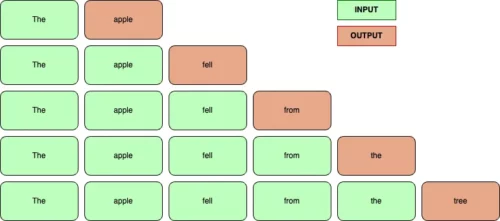
Inverting Dictionary (for Reverse Lookup)
d1 = {'a': 1, 'b': 2, 'c': 3}
val = 2

# Invert the dictionary
d2 = {v: k for k, v in d1.items()}

# Print the key corresponding to the value 2
print(d2.get(val))
Let’s start by briefly describing what fine-tuning is. It is all about adjusting a model to fit your specific needs by tweaking its weights. Imagine you’re dealing with legal documents where words like ‘consideration’ take on a whole new meaning compared to everyday speech or what the model has been trained on. Fine-tuning steps in to make sure the model gets these specialized terms right. It’s not just about words either — you can also set up the model to follow specific rules, like keeping answers short and to the point, or understanding your business needs to a deeper level. So, if you’re planning to deploy it in production, this process transforms a general-purpose model into something custom-built for your data.
The lightweight models, specifically the 1B and 3B ({N}B = N billion parameters, for positive integer N), are among the most interesting for a variety of reasons. They are relatively easy to run locally, unlike the larger versions of LLMs and Meta claims they can be smoothly deployed on hardware found in mobile devices. This opens the door to many applications, as language processing can be done locally, without data leaving the device. As a result, these models are not reliant on a stable internet connection and offer a more private handling of sensitive information. With these advantages, we can expect to see more tools like personal assistants running on our smartphones.
Here you have many plugins listed as part of my configuration, we can highlight Jedi-Vim for autocompletion, Vim-Polyglot a collection of language packs for Vim, or NerdTree, a file manager for VIM, among others, as well as settings for auto-indent, line numbers, and additional configurations that will make your life easier.
Nothing beats the bar chart for fast data exploration and comparison of variable values between different groups, or building a story around how groups of data are composed.
The advantage of bar charts (or “bar plots”, “column charts”) over other chart types is that the human eye has evolved a refined ability to compare the length of objects, as opposed to angle or area.
Luckily for Python users, options for visualisation libraries are plentiful, and Pandas itself has tight integration with the Matplotlib visualisation library, allowing figures to be created directly from DataFrame and Series data objects. This blog post focuses on the use of the DataFrame.plot functions from the Pandas visualisation API.
When you specify as arguments . and !, all instances of both will get removed:
phrase = ".....Python !!!"

stripped_phrase = phrase.strip(".!")

print(stripped_phrase)

#output
#Python
The try except statement can handle exceptions. Exceptions may happen when you run a program.
Exceptions are errors that happen during execution of the program. Python won’t tell you about errors like syntax errors (grammar faults), instead it will abruptly stop.
An abrupt exit is bad for both the end user and developer.
Instead of an emergency halt, you can use a try except statement to properly deal with the problem. An emergency halt will happen if you do not properly handle exceptions.
The idea of the try-except block is this:
It may be combined with the else and finally keywords.
try:
    lunch()
except SyntaxError:
    print('Fix your syntax')
except TypeError:
    print('Oh no! A TypeError has occured')
except ValueError:
    print('A ValueError occured!')
except ZeroDivisionError:
    print('Did by zero?')
else:
    print('No exception')
finally:
    print('Ok then')
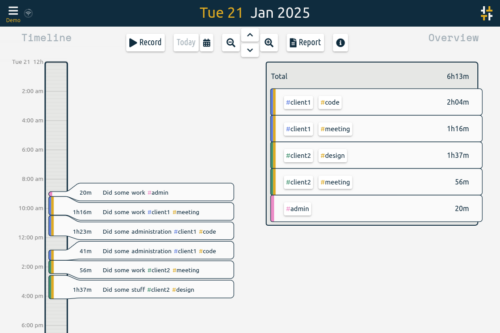
An open source time-tracker with an interactive user experience and powerful reporting.
To somewhat expand on the earlier answers here, there are a number of details which are commonly overlooked.
subprocess.run() over subprocess.check_call() and friends over subprocess.call() over subprocess.Popen() over os.system() over os.popen()text=True, aka universal_newlines=True.shell=True or shell=False and how it changes quoting and the availability of shell conveniences.sh and Bashtest_list = [1, 2, 3, 4, 5, 6, 6] N = 2 # using list slicing # Get first N elements from list res = test_list[:N]
# Python3 code to demonstrate working of
# Append suffix / prefix to strings in list
# Using list comprehension + "+" operator

# initializing list
test_list = ['a', 'b', 'c', 'd']

# printing list
print("The original list : " + str(test_list))

# initializing append_str
append_str = 'gfg'

# Append suffix / prefix to strings in list
pre_res = [append_str + sub for sub in test_list]
suf_res = [sub + append_str for sub in test_list]

# Printing result
print("list after prefix addition : " + str(pre_res))
print("list after suffix addition : " + str(suf_res))
Frictionless is an open-source toolkit that brings simplicity to the data experience – whether you’re wrangling a CSV or engineering complex pipelines.
CKAN is an open-source DMS (data management system) for powering data hubs and data portals. CKAN makes it easy to publish, share and use data. It powers hundreds of data portals worldwide.
Flask is an API of Python that allows us to build up web-applications. It was developed by Armin Ronacher. Flask’s framework is more explicit than Django’s framework and is also easier to learn because it has less base code to implement a simple web-Application. A Web-Application Framework or Web Framework is the collection of modules and libraries that helps the developer to write applications without writing the low-level codes such as protocols, thread management, etc. Flask is based on WSGI(Web Server Gateway Interface) toolkit and Jinja2 template engine.
Learn how to install and use Docker to run a multi-service Flask, Celery and Redis application in development with Docker Compose.
To understand what Flask is you have to understand a few general terms.
WSGI Web Server Gateway Interface (WSGI) has been adopted as a standard for Python web application development. WSGI is a specification for a universal interface between the web server and the web applications.
Werkzeug It is a WSGI toolkit, which implements requests, response objects, and other utility functions. This enables building a web framework on top of it. The Flask framework uses Werkzeug as one of its bases.
jinja2 jinja2 is a popular templating engine for Python. A web templating system combines a template with a certain data source to render dynamic web pages.
Flask is a web application framework written in Python. Flask is based on the Werkzeug WSGI toolkit and Jinja2 template engine. Both are Pocco projects.
Web scraper is a technique for extracting structured information from a web page. With Python, you can build a efficient web scraper by using BeautifulSoup, requests and other libraries. However, these solution is not fast enough. In this article, I will show you some tips to build a super fast web scraper with Python.
GUI written in Python to parse OSM (OpenStreetMap) files and render them onscreen. Layers may be toggled on/off and drawing may be customized.
This program allows a user to render OSM files within the GUI. The GUI enables the user to easily modify which layers are visible and the style of these layers.
The program exports maps as images.
a process by which you can generate your own custom-made stylized maps. A stylized map is a map where the user can specify which data layers are visualized, as well as define the style with which each layer is visualized. I will first describe the process through which you can write software to stylize maps, followed by an example of the Python software I wrote to perform this task.
Pelican is a static site generator that requires no database or server-side logic.
instagram-scraper is a command-line application written in Python that scrapes and downloads an instagram user’s photos and videos. Use responsibly.
virtualenv is a very popular tool that creates isolated Python environments for Python libraries. If you’re not familiar with this tool, I highly recommend learning it, as it is a very useful tool, and I’ll be making comparisons to it for the rest of this answer.
It works by installing a bunch of files in a directory (eg: env/), and then modifying the PATH environment variable to prefix it with a custom bin directory (eg: env/bin/). An exact copy of the python or python3 binary is placed in this directory, but Python is programmed to look for libraries relative to its path first, in the environment directory. It’s not part of Python’s standard library, but is officially blessed by the PyPA (Python Packaging Authority). Once activated, you can install packages in the virtual environment using pip.
pyenv is used to isolate Python versions. For example, you may want to test your code against Python 2.7, 3.6, 3.7 and 3.8, so you’ll need a way to switch between them. Once activated, it prefixes the PATH environment variable with ~/.pyenv/shims, where there are special files matching the Python commands (python, pip). These are not copies of the Python-shipped commands; they are special scripts that decide on the fly which version of Python to run based on the PYENV_VERSION environment variable, or the .python-version file, or the ~/.pyenv/version file. pyenv also makes the process of downloading and installing multiple Python versions easier, using the command pyenv install.pyenv-virtualenv is a plugin for pyenv by the same author as pyenv, to allow you to use pyenv and virtualenv at the same time conveniently. However, if you’re using Python 3.3 or later, pyenv-virtualenv will try to run python -m venv if it is available, instead of virtualenv. You can use virtualenv and pyenv together without pyenv-virtualenv, if you don’t want the convenience features.virtualenvwrapper is a set of extensions to virtualenv (see docs). It gives you commands like mkvirtualenv, lssitepackages, and especially workon for switching between different virtualenv directories. This tool is especially useful if you want multiple virtualenv directories.pyenv-virtualenvwrapper is a plugin for pyenv by the same author as pyenv, to conveniently integrate virtualenvwrapper into pyenv.pipenv aims to combine Pipfile, pip and virtualenv into one command on the command-line. The virtualenv directory typically gets placed in ~/.local/share/virtualenvs/XXX, with XXX being a hash of the path of the project directory. This is different from virtualenv, where the directory is typically in the current working directory. pipenv is meant to be used when developing Python applications (as opposed to libraries). There are alternatives to pipenv, such as poetry, which I won’t list here since this question is only about the packages that are similarly named.pyvenv is a script shipped with Python 3 but deprecated in Python 3.6 as it had problems (not to mention the confusing name). In Python 3.6+, the exact equivalent is python3 -m venv.venv is a package shipped with Python 3, which you can run using python3 -m venv (although for some reason some distros separate it out into a separate distro package, such as python3-venv on Ubuntu/Debian). It serves the same purpose as virtualenv, but only has a subset of its features (see a comparison here). virtualenv continues to be more popular than venv, especially since the former supports both Python 2 and 3.This is my personal recommendation for beginners: start by learning virtualenv and pip, tools which work with both Python 2 and 3 and in a variety of situations, and pick up other tools once you start needing them.
virtualenvwrapper is a set of extensions to Ian Bicking’s virtualenv tool. The extensions include wrappers for creating and deleting virtual environments and otherwise managing your development workflow, making it easier to work on more than one project at a time without introducing conflicts in their dependencies.
Features
Organizes all of your virtual environments in one place.
Wrappers for managing your virtual environments (create, delete, copy).
Use a single command to switch between environments.
Tab completion for commands that take a virtual environment as argument.
User-configurable hooks for all operations (see Per-User Customization).
Plugin system for creating more sharable extensions (see Extending Virtualenvwrapper).
This guide discusses how to install packages using pip and a virtual environment manager: either venv for Python 3 or virtualenv for Python 2. These are the lowest-level tools for managing Python packages and are recommended if higher-level tools do not suit your needs.
Well, a virtual environment is just a directory with three important components:
A site-packages/ folder where third party libraries are installed.
Symlinks to Python executables installed on your system.
Scripts that ensure executed Python code uses the Python interpreter and site packages installed inside the given virtual environment.
(venv) % pip freeze
numpy==1.15.3
And write the output to a file, which we’ll call requirements.txt.
(venv) % pip freeze > requirements.txt
Duplicating Environments
Sara% cd test-project/
Sara% python3 -m venv venv/
(venv) Sara% pip install -r requirements.txtCollecting numpy==1.15.3 (from -r i (line 1))
Installing collected packages: numpy
Successfully installed numpy-1.15.3
…python -m pip executes pip using the Python interpreter you specified as python. So /usr/bin/python3.7 -m pip means you are executing pip for your interpreter located at /usr/bin/python3.7.
But when you use python -m pip with python being the specific interpreter you want to use, all of the above ambiguity is gone. If I say python3.8 -m pip then I know pip will be using and installing for my Python 3.8 interpreter (same goes for if I had said python3.7).
While we’re on the subject of how to avoid messing up your Python installation, I want to make the point that you should never install stuff into your global Python interpreter when you. develop locally (containers are a different matter)! If it’s your system install of Python then you may actually break your system if you install an incompatible version of a library that your OS relies on.
To create a «polls» app in the «apps» sub-directory, do the following first to make the directory (assuming you are at the root of your django project):
mkdir apps/polls
Next, run startapp to create «polls» in under the «app» project directory.
startapp polls apps/polls
Install the app;
INSTALLED_APPS = [
‘apps.polls’
]
migrate:
makemigrations polls
migrate
optional:
main urls.py
urlpatterns = [
path(‘polls/’,include(‘apps.polls.urls’),
]
Este tutorial no te convertirá en programadora de la noche a la mañana. Si quieres ser buena en esto, necesitarás meses o incluso años de aprendizaje y práctica. Sin embargo queremos enseñarte que programar o crear sitios web no es tan complicado como parece. Intentaremos explicar las cosas lo mejor que podamos, para perderle el miedo a la tecnología.
To visualize and better understand a project structure we can create UML class diagrams from Django models.
We will use a special command for this task included in the django-extensions package called: graph_models

Django is an extremely popular and fully featured server-side web framework, written in Python. This module shows you why Django is one of the most popular web server frameworks, how to set up a development environment, and how to start using it to create your own web applications.
Django web applications typically group the code that handles each of these steps into separate files:
URLs: While it is possible to process requests from every single URL via a single function, it is much more maintainable to write a separate view function to handle each resource. A URL mapper is used to redirect HTTP requests to the appropriate view based on the request URL. The URL mapper can also match particular patterns of strings or digits that appear in a URL and pass these to a view function as data.
View: A view is a request handler function, which receives HTTP requests and returns HTTP responses. Views access the data needed to satisfy requests via models, and delegate the formatting of the response to templates.
Models: Models are Python objects that define the structure of an application’s data, and provide mechanisms to manage (add, modify, delete) and query records in the database.
Templates: A template is a text file defining the structure or layout of a file (such as an HTML page), with placeholders used to represent actual content. A view can dynamically create an HTML page using an HTML template, populating it with data from a model. A template can be used to define the structure of any type of file; it doesn’t have to be HTML!
After reading this article, you will get:
How to write SCSS/SASS using NPM for your Django project
How to deploy Django project which uses NPM as front-end solution
After reading this article, you will get:
The difference between CSS, SCSS, SASS
How to make Bootstrap SCSS work in your Django project.
How to deploy SCSS in Django project.
Python has been around since the nineties. That doesn’t only mean that it has had plenty of time to grow. It has also acquired a large and supportive community.
Since Python has been around for so long, developers have made a package for every purpose. These days, you can find a package for almost everything.
Want to crunch numbers, vectors and matrices? NumPy is your guy.
Want to do calculations for tech and engineering? Use SciPy.
Want to go big in data manipulation and analysis? Give Pandas a go.
Want to start out with Artificial Intelligence? Why not use Scikit-Learn.
DevOps is the combination of application development and operations, which minimizes or eliminates the disconnect between software developers who build applications and systems administrators who keep infrastructure running.
The mod_wsgi package implements a simple to use Apache module which can host any Python web application which supports the Python WSGI specification.
Python is a high level open source scripting language. Python’s built-in «re» module provides excellent support for regular expressions, with a modern and complete regex flavor. The only significant features missing from Python’s regex syntax are atomic grouping, possessive quantifiers, and Unicode properties.
The first thing to do is to import the regexp module into your script with import re.
The urllib2 module can be used to download data from the web (network resource access). This data can be a file, a website or whatever you want Python to download. The module supports HTTP, HTTPS, FTP and several other protocols.
If we’re looking to check if a file exists, there are a few solutions:
Check if a file exists with a try/except block (Python 2+)
Check if a file exists using os.path (Python 2+)
Check if a file exists using the Path object (Python 3.4+)
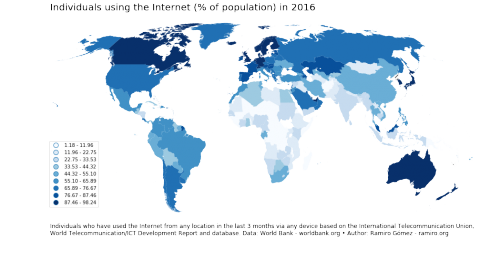
There are different ways of creating choropleth maps in Python. In a previous notebook, I showed how you can use the Basemap library to accomplish this. More than 2 years have passed since publication and the available tools have evolved a lot. In this notebook I use the GeoPandas library to create a choropleth map. As you’ll see the code is more concise and easier to follow along.
NumPy (short for Numerical Python) is one of the top libraries equipped with useful resources to help data scientists turn Python into a powerful scientific analysis and modelling tool. The popular open source library is available under the BSD license. It is the foundational Python library for performing tasks in scientific computing. NumPy is part of a bigger Python-based ecosystem of open source tools called SciPy.
Pandas is another great library that can enhance your Python skills for data science. Just like NumPy, it belongs to the family of SciPy open source software and is available under the BSD free software license.
Matplotlib is also part of the SciPy core packages and offered under the BSD license. It is a popular Python scientific library used for producing simple and powerful visualizations. You can use the Python framework for data science for generating creative graphs, charts, histograms, and other shapes and figures—without worrying about writing many lines of code. For example, let’s see how the Matplotlib library can be used to create a simple bar chart.
