Vite. The Build Tool for the Web

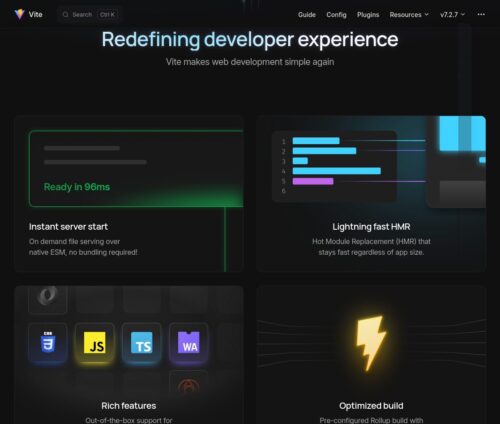
Vite is a blazing fast frontend build tool powering the next generation of web applications.


Vite is a blazing fast frontend build tool powering the next generation of web applications.

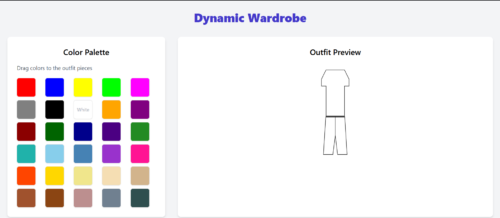
In this tutorial, we’ll build a dynamic wardrobe app using React. You’ll learn to structure components, handle drag-and-drop interactions, and craft a smooth user experience.

Since we will manage files and dependencies we choose Flask for a quick example. Any other framework could be used, it only consist on importing correctly all libraries.
The libraries used are the following:
Jquery: Common library used almost for anything. (Desc)
Jquery UI: Visual extension for Jquery (Desc, in this case used to create the time slider. We also add another extension (Ui slider pips) to this slider to customize even more.
D3: D3.js is a JavaScript library for manipulating documents based on data. D3 helps you bring data to life using HTML, SVG, and CSS. In this case we use to create a map of Spain. More examples of D3 here.
D3 composite: Extension of D3 that allow to create proyections of maps. For example, in the case of Spain since the canary islands are far away from the peninsula, only using D3 we have a really off center map. This library also provides Spain provinces limits . Important: This library only works with the current set of Jquery and D3 version, if you want to use other versions, check the docs page.
.js is JavaScript, plain and simple
.ts is TypeScript, Microsoft’s way of adding “concrete” types to JavaScript
.jsx is JavaScript but with JSX enabled which is React’s language extension to allow you to write markup directly in code
.tsx is similar to jsx except it’s TypeScript with the JSX language extension
Learn how to create a modal image gallery (lightbox) with CSS and JavaScript.
1. Avoid var Keyword: A Relic of the Past
Before ES6, the var keyword was the primary way to declare variables. However, it had some quirks and limitations that often led to unexpected results and made debugging more challenging.
In modern JavaScript, we generally avoid using var and instead opt for let and const, which offer more predictable and block-scoped behavior, making your code easier to understand and maintain.
2. let: Variables That Can Change
Use the let keyword to declare variables whose values you might need to change later in your code.
3. const: Constants for Unchanging Values:
If you have a value that shouldn’t change throughout your program, use the const keyword.
A good rule of thumb is to use const by default and only switch to let if you know you’ll need to reassign the variable’s value later.
Detecting the Safari browser: The user-agent of the Safari browser is “Safari”. This value is passed to indexOf() method to detect this value in the user-agent string. One additional check is required in the case of the Safari browser as the user-agent of the Chrome browser also includes the Safari browser’s user-agent. If both the user-agents of Chrome and Safari are in the user-agent, it means that the browser is Chrome, and hence the Safari browser value is discarded.
When considering using the user agent string to detect which browser is being used, your first step is to try to avoid it if possible. Start by trying to identify why you want to do it.
interact.js takes a slightly different approach compared to most drag and drop libraries. To give you as much control as possible, it tries to provide a simple, flexible API that gives you all the pointer event data you’ll need to move elements around.
The library doesn’t even do any moving at all! This is great because you decide exactly what feedback your users get. You can drag elements, draw on a canvas or (if you really need to) scroll the page.
A vanilla JavaScript library to create a draggable & resizable dialog popup without any frameworks or libraries (e.g. jQuery UI).
To move, drag from the title bar of the dialog box.
To resize, drag from any edge or any corner of the dialog box.
const TagCloud = require('TagCloud');

const container = '.tagcloud';
const texts = [
    '3D', 'TagCloud', 'JavaScript',
    'CSS3', 'Animation', 'Interactive',
    'Mouse', 'Rolling', 'Sphere',
    '6KB', 'v2.x',
];
const options = {};

TagCloud(container, texts, options);
The json() method of the Response interface takes a Response stream and reads it to completion. It returns a promise which resolves with the result of parsing the body text as JSON.
const myList = document.querySelector("ul");
const myRequest = new Request("products.json");

fetch(myRequest)
  .then((response) => response.json())
  .then((data) => {
    for (const product of data.products) {
      const listItem = document.createElement("li");
      listItem.appendChild(document.createElement("strong")).textContent = product.Name;
      listItem.append(` can be found in ${product.Location}. Cost: `);
      listItem.appendChild(document.createElement("strong")).textContent = `£${product.Price}`;
      myList.appendChild(listItem);
    }
  })
  .catch(console.error);
The Function.prototype.bind() method lets you establish a fixed this context for all subsequent calls — bypassing problems where it’s unclear what this will be, depending on the context from which your function was called. Note, however, that you’ll need to keep a reference to the listener around so you can remove it later.
class Something {
  name = "Something Good";
  constructor(element) {
    // bind causes a fixed `this` context to be assigned to `onclick2`
    this.onclick2 = this.onclick2.bind(this);
    element.addEventListener("click", this.onclick1, false);
    element.addEventListener("click", this.onclick2, false); // Trick
  }
  onclick1(event) {
    console.log(this.name); // undefined, as `this` is the element
  }
  onclick2(event) {
    console.log(this.name); // 'Something Good', as `this` is bound to the Something instance
  }
}

const s = new Something(document.body);
Thousands of developers use Medusa’s open-source commerce modules and tools to build rich, reliable, and performant commerce applications without reinventing core commerce logic.
We build modularized commerce logic like carts, products, and order management and provide tools to orchestrate them for powerful ecommerce websites, POS applications, commerce-enabled products, and everything in between.
Our modules are incredibly portable and can run in modern JavaScript environments, unlocking new infrastructure for unparalleled scalability and performance, while bringing commerce enablement to new layers of your stack.
This tutorial is meant for D3 v5-v7.
This tutorial is a quick intro to D3.js, a Javascript library for creating interactive data visualizations in the browser. D3 is built on top of common web standards like HTML, CSS, and SVG.
This is not designed to be a deep dive — this tutorial will teach you how to learn D3 and give you a high-level understanding of this powerful tool.

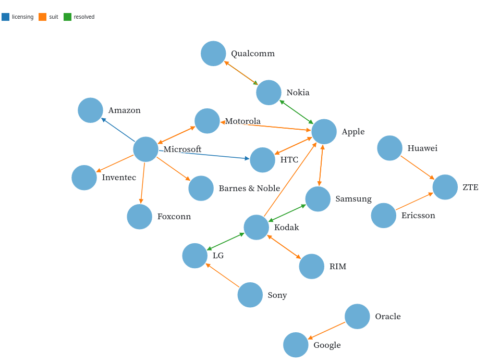
a fork on the classic original because I found the straigth arrows to be more pleasant (especially if using a single color) by changing linkArc() and increasing the arrow length by a little using forceCollide(). I also increased the radius and the text positioning.
Broadly speaking there are 4 steps to setting up a force simulation:
forceSimulation, passing in the array of objectsforceManyBody, forceCenter, forceCollide) to the systemI’ve just had a nice experience improving and modernizing a large JavaScript codebase in a WordPress plugin. The original code was written in an old-fashioned way with jQuery in a single large file. Using modern EcmaScript and tools like Webpack, I was able to split it into modules and improve the code structure. The new code is much more readable and maintainable, and of course, fewer bugs. In this tutorial, I’ll show you how I did that.
ECMAScript 2015 or ES2015 is a significant update to the JavaScript programming language. It is the first major update to the language since ES5 which was standardized in 2009. Therefore, ES2015 is often called ES6.
cola.js (A.K.A. “WebCoLa”) is an open-source JavaScript library for arranging your HTML5 documents and diagrams using constraint-based optimization techniques.
It works well with libraries like D3.js, svg.js, and Cytoscape.js. The core layout is based on a complete rewrite in Javascript of the C++ libcola library.
It also has an adaptor for d3.js that allows you to use cola as a drop-in replacement for the D3 force layout. The layout converges to a local optimum unlike the D3 force layout, which forces convergence through a simple annealing strategy. Thus, compared to D3 force layout:
Basic check is simple, wait for the ended event. This is so simple you can just google it.
Now to check that user played full video an extensive analysis would be needed checking if he played every second of it. That’s not necessary however, it should be enough that user:
This snippet demonstrates exactly that. The video will not be marked as fully played if you just skip to the end. Playing the beginning over and over will also not mark it fully played
In the first parts we focus on the basics. We set up a development environment with running compilation of our code. And the basics of how to register a block and the necessary PHP parts of it as well. We’ll learn about the huge library of components and methods available to us from WordPress Gutenberg.
Moving on we’ll learn about how to add sections and settings for our block in the editor sidebar (Inspector) as well as customizing the toolbar. Along the way we’ll touch a lot of different input types and how to use Gutenberg’s component for these. And of course we’ll learn how to save, update and output the saved information to our block – and how that works behind the scenes.
At the end we’ll look at more advanced things like dynamic blocks and how to use PHP to render the block output. And finally how to make post queries inside the editor – allowing the user to select a post from a list for render.
SlotFill is a modernized take on classic interface “hooks and filters”—a convention for empowering developers to extend the publishing interface outside of the block editor itself—that found its way into WordPress.
The easiest way to achieve this, is to consider the gallery as a Dynamic block and re-declare its render through PHP:
Extensibility is key, and we can’t build the next generation of the WordPress Editor without making it extensible. What does “making it extensible” mean? Does this mean providing hooks and filters in JavaScript the same way we do in PHP? Does this mean allowing plugins to extend and tweak any UI component used by Gutenberg? Does this mean adding filters to the REST API? Does this mean Giving access to an Editor object to manipulate the editor’s content?
There’s no clear answer to all these questions. Extensibility is a very difficult problem and unless you build it with real use-cases in mind, you’re more likely to get it wrong. (and being stuck with it for a long time).
just came across paged.js, a JavaScript library specifically made to make it easy to use HTML and CSS to make websites that look nice when printed or saved as PDFs, and it looks really interesting.
Asynchronous requests will wait for a timer to finish or a request to respond while the rest of the code continues to execute. Then when the time is right a callback will spring these asynchronous requests into action.
Generators
One use for generators is that they allow you to have async code looking like sync.
Instead of returning with a return, generators have a yield statement. It stops the function execution until a .next is made for that function iteration. It is similar to .then promise that only executes when resolved comes back.
Async/Await
This method seems like a mix of generators with promises. You just have to tell your code what functions are to be async. And what part of the code will have to await for that promise to finish.
The async and await keywords are a great addition to Javascript. They make it easier to read (and write) code that runs asynchronously. That includes things like:
API calls (using fetch or a library like axios);
Timeouts (though these need a little extra work); or
Reading/writing files if you’re using NodeJS.
I’m going to assume you’re familiar with Promises and making a simple async/await call. Where it can get tricky is when we have a whole bunch of tasks in an array. You might run through the array expecting calls to run one-by-one. But instead, they run through all together and don’t wait for each individual item to resolve. Or, you might find yourself with the opposite problem. You run through your array in a loop, wanting them to run in parallel. But instead, it waits and does them one by one. And sometimes, you try something and it doesn’t work at all. The program just continues after the loop instead of waiting until the calls are all done. You end up wondering if there’s something you’re missing.
Promises simplify deferred and asynchronous computations. A promise represents an operation that hasn’t completed yet.
A promise can be:
fulfilled – The action relating to the promise succeeded
rejected – The action relating to the promise failed
pending – Hasn’t fulfilled or rejected yet
settled – Has fulfilled or rejected
Promise is used to overcome issues with multiple callbacks and provide better way to manage success and error conditions.
Promise is an object which is returned by the async function like ajax. Promise object has three states
pending :- means the async operation is going on.
resovled :- async operation is completed successfully.
rejected :- async operation is completed with error.
There are two parts using a promise object. Inside async function (Part1) and where its called (Part2).
Part1 — Inside Async function,
Promise object is created.
Async function returns the promise object
If async is done successfully, promise object is resolved by calling its resolve method.
If async is done with error, promise object is rejected by calling its rejected method.
Part2 — Outside Async function
Call the function and get the promise object
Attach success handler, error handler on the promise object using then method
Cross Domain Call
By Default, AJAX cannot make cross domain call, browser will reject the calls to the different domain. In order to make cross domain call there are two options
Using CORS
Using JSONP
Both the options requires some server changes. It cannot be done purely using javascript.
CORS is the new way to deal with cross origin AJAX request. github api are CORS enabled. In order to enable CORS, response should contain Access-Control-Allow-Origin header with the domain value or * to work for all. Github has set as *.
JSONP can also be used if CORS cannot be enabled by server or for old browsers. JSONP actually uses script tag to get the data from the server. Script is allowed to be fetched from any domain, So in JSONP, we need to create a script with the url as src and the server has to wrap the response in a callback function. Response sent by server is actually a javascript code which contains data inside a wrapper function. In JSONP, there is no ajax call being made.
…you need to use .on() delegated event handling with mouseenter and mouseleave and an event handler for each.
Essentially, a promise is a returned object to which you attach callbacks, instead of passing callbacks into a function.
A common need is to execute two or more asynchronous operations back to back, where each subsequent operation starts when the previous operation succeeds, with the result from the previous step. We accomplish this by creating a promise chain.
Promises solve a fundamental flaw with the callback pyramid of doom, by catching all errors, even thrown exceptions and programming errors. This is essential for functional composition of asynchronous operations.
An Ajax call is a specific type of asynchronous operation. You can make an Ajax call either with a traditional callback using the XMLHttpRequest interface or you can make an Ajax call (in modern browsers), using a promise with the fetch() interface.
The goal was to be able to create custom style sheets and allow for the coloring of icons