how to disable download video option

Just add controlsList="nodownload" in your video tag.

Just add controlsList="nodownload" in your video tag.
The importance of wp_localize_script is when you can pass data directly from PHP to JavaScript.
Functions is very easy to handle there are only 3 parameters required :
$handle
(string) (Required) Script handle the data will be attached to.
$object_name
(string) (Required) Name for the JavaScript object. Passed directly, so it should be qualified JS variable. Example: ‘/[a-zA-Z0-9_]+/’.
$l10n
(array) (Required) The data itself. The data can be either a single or multi-dimensional array.
You can use single_template filter hook.
function load_movie_template( $template ) {
    global $post;

    if ( 'movie' === $post->post_type && locate_template( array( 'single-movie.php' ) ) !== $template ) {
        /*
         * This is a 'movie' post
         * AND a 'single movie template' is not found on
         * theme or child theme directories, so load it
         * from our plugin directory.
         */
        return plugin_dir_path( __FILE__ ) . 'single-movie.php';
    }

    return $template;
}

add_filter( 'single_template', 'load_movie_template' );
There are a few steps to create the custom quick edit box and custom column
This tutorial is meant for D3 v5-v7.
This tutorial is a quick intro to D3.js, a Javascript library for creating interactive data visualizations in the browser. D3 is built on top of common web standards like HTML, CSS, and SVG.
This is not designed to be a deep dive — this tutorial will teach you how to learn D3 and give you a high-level understanding of this powerful tool.
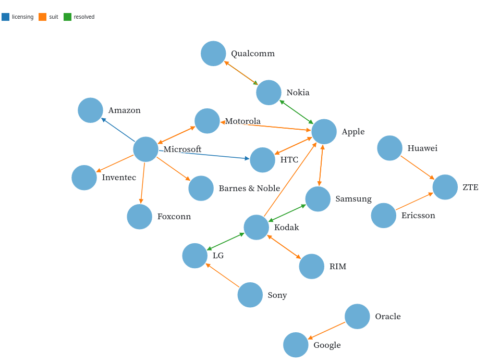
a fork on the classic original because I found the straigth arrows to be more pleasant (especially if using a single color) by changing linkArc() and increasing the arrow length by a little using forceCollide(). I also increased the radius and the text positioning.
Broadly speaking there are 4 steps to setting up a force simulation:
forceSimulation, passing in the array of objectsforceManyBody, forceCenter, forceCollide) to the systemI’ve just had a nice experience improving and modernizing a large JavaScript codebase in a WordPress plugin. The original code was written in an old-fashioned way with jQuery in a single large file. Using modern EcmaScript and tools like Webpack, I was able to split it into modules and improve the code structure. The new code is much more readable and maintainable, and of course, fewer bugs. In this tutorial, I’ll show you how I did that.
ECMAScript 2015 or ES2015 is a significant update to the JavaScript programming language. It is the first major update to the language since ES5 which was standardized in 2009. Therefore, ES2015 is often called ES6.
cola.js (A.K.A. «WebCoLa») is an open-source JavaScript library for arranging your HTML5 documents and diagrams using constraint-based optimization techniques.
It works well with libraries like D3.js, svg.js, and Cytoscape.js. The core layout is based on a complete rewrite in Javascript of the C++ libcola library.
It also has an adaptor for d3.js that allows you to use cola as a drop-in replacement for the D3 force layout. The layout converges to a local optimum unlike the D3 force layout, which forces convergence through a simple annealing strategy. Thus, compared to D3 force layout:
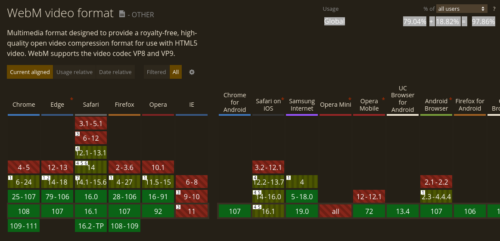
WebM video format. Multimedia format designed to provide a royalty-free, high-quality open video compression format for use with HTML5 video. WebM supports the video codec VP8 and VP9.
Global 79.04% + 18.82% = 97.86%
Basic check is simple, wait for the ended event. This is so simple you can just google it.
Now to check that user played full video an extensive analysis would be needed checking if he played every second of it. That’s not necessary however, it should be enough that user:
This snippet demonstrates exactly that. The video will not be marked as fully played if you just skip to the end. Playing the beginning over and over will also not mark it fully played
In light of a recent German court case, which fined a website owner for violating the GDPR by using Google-hosted webfonts, WordPress.org’s themes team is updating its recommendations for hosting webfonts. Most theme authors have been enqueuing Google Fonts from the Google CDN for better performance, but this method exposes visitors’ IP addresses.
“The themes team strongly encourages the theme authors to update their themes,” Themes Team representative @benachi said in a recent announcement. “We recommend updating by switching to locally hosted webfonts. Luckily Google Fonts can be downloaded and bundled in a theme. Bundled font files allow users to host webfonts locally and comply with GDPR.”
Why bother with a random green when you can choose to be a #BADA55!

Just add your desired image size (width & height) after the service URL, and you’ll get a random image:
https://picsum.photos/200/300
The autocomplete is generated with help from jQuery UI Autocomplete, a script that is included in WordPress as default.
Enable HTTP/2 module
Apache’s HTTP/2 support comes from the mod_http2 module. Enable it from:
a2enmod http2
apachectl restart
If above commands do not work in your system (which is likely the case in CentOS/RHEL), use LoadModule directive in httpd configuration directory to enable http2 module.
Add HTTP/2 Support
We highly recommend you enable HTTPS support for your web site first. Most web browser simply do not support HTTP/2 over plain text. Besides, there are no excuses to not use HTTPS anymore. HTTP/2 can be enabled site-by-site basis. Locate your web site’s Apache virtual host configuration file, and add the following right after the opening
Protocols h2 http/1.1
It turns out this was the easy part. All you need to do is symlink your VVV directory to whatever syncing program you happen to be using (Dropbox, Google Drive, etc.). You can also move your entire VVV directory into Dropbox, but I prefer a symlink to keep the separation.

…decenas de revistas, cuentos, webs y aplicaciones comerciales con una estética similar a la de la ilustración que decora este artículo. A ese estilo se le conoce como «Alegria» o «Corporate Memphis». Es un producto de la precarización y la devaluación del trabajo y tiene decenas de variantes y versiones, todas igualmente exánimes y repetitivas.
El resultado es un cambio cualitativo. Cualquiera puede hacer una ilustración dentro de los códigos visuales del «Corporate Memphis». Ya no es solo que el ilustrador -uno de los últimos artesanos- se haya proletarizado, ni siquiera que una vez proletarizado haya sido expulsado de la oficina y se haya precarizado al extremo vendiendo horas de trabajo en una plataforma. Ahora el ilustrador como tal es ya innecesario.
La automatización combinatoria de un código estándar de imágenes pre-diseñadas permitirá que ilustrar se convierta en una tarea más del desarrollador web. Una entre otras muchas que ya se han automatizado o están en camino de hacerlo. Porque el desarrollador es el primero que ha sufrido la estandarización y procedimentación automatizada de su trabajo. Ahora, Inteligencia Artificial mediante, está siendo alienado incluso de la algoritmia.
Web scraper is a technique for extracting structured information from a web page. With Python, you can build a efficient web scraper by using BeautifulSoup, requests and other libraries. However, these solution is not fast enough. In this article, I will show you some tips to build a super fast web scraper with Python.
Use the –user=
You can use the $options array to set the samesite value, for example:
setcookie($name, $value, [
‘expires’ => time() + 86400,
‘path’ => ‘/’,
‘domain’ => ‘domain.com’,
‘secure’ => true,
‘httponly’ => true,
‘samesite’ => ‘None’,
]);
The value of the samesite element should be either None, Lax or Strict.
So how do you set cookies in WordPress? With core constants:
COOKIEPATH — Server path in which the cookie will be available on.
COOKIE_DOMAIN — The (sub)domain that the cookie is available to.
Setting cookies in WordPress, especially the expiration is a cinch using one of the core time constants, available since v3.5:
MINUTE_IN_SECONDS = 60 seconds
HOUR_IN_SECONDS = 3,600 seconds
DAY_IN_SECONDS = 86,400 seconds
WEEK_IN_SECONDS = 604,800 seconds
MONTH_IN_SECONDS = 2,629,746 seconds
YEAR_IN_SECONDS = 31,556,952 seconds
Don’t forget to add the current timestamp to one of these constants, for example:
// 5 minutes into the future
$five_minutes = current_time( ‘timestamp’ ) + ( MINUTE_IN_SECONDS * 5 );
In the first parts we focus on the basics. We set up a development environment with running compilation of our code. And the basics of how to register a block and the necessary PHP parts of it as well. We’ll learn about the huge library of components and methods available to us from WordPress Gutenberg.
Moving on we’ll learn about how to add sections and settings for our block in the editor sidebar (Inspector) as well as customizing the toolbar. Along the way we’ll touch a lot of different input types and how to use Gutenberg’s component for these. And of course we’ll learn how to save, update and output the saved information to our block – and how that works behind the scenes.
At the end we’ll look at more advanced things like dynamic blocks and how to use PHP to render the block output. And finally how to make post queries inside the editor – allowing the user to select a post from a list for render.
Say you want to intercept a response from any WordPress API call before it gets returned to the user? For example, you want to block /users/ route or append additional content to a /posts/ response. Simply call the rest_pre_echo_response filter and you can modify all responses!
Adds value `lang` and `translations` to WP REST api response for each Post and Page request for site running the Polylang Pro plugin.
Adds polylang_translations and keeps lang to WP REST api response for each Post and Page request for site running the Polylang Pro plugin.
SlotFill is a modernized take on classic interface “hooks and filters”—a convention for empowering developers to extend the publishing interface outside of the block editor itself—that found its way into WordPress.
The easiest way to achieve this, is to consider the gallery as a Dynamic block and re-declare its render through PHP:
Extensibility is key, and we can’t build the next generation of the WordPress Editor without making it extensible. What does “making it extensible” mean? Does this mean providing hooks and filters in JavaScript the same way we do in PHP? Does this mean allowing plugins to extend and tweak any UI component used by Gutenberg? Does this mean adding filters to the REST API? Does this mean Giving access to an Editor object to manipulate the editor’s content?
There’s no clear answer to all these questions. Extensibility is a very difficult problem and unless you build it with real use-cases in mind, you’re more likely to get it wrong. (and being stuck with it for a long time).
just came across paged.js, a JavaScript library specifically made to make it easy to use HTML and CSS to make websites that look nice when printed or saved as PDFs, and it looks really interesting.
Pelican is a static site generator that requires no database or server-side logic.
apply_filters($tag, $value) passes the ‘value’ argument to each of the functions ‘hooked’ (using add_filter) into the specified filter ‘tag’. Each function performs some processing on the value and returns a modified value to be passed to the next function in the sequence.
function slugify($urlString) {
$search = array(‘Ș’, ‘Ț’, ‘ş’, ‘ţ’, ‘Ş’, ‘Ţ’, ‘ș’, ‘ț’, ‘î’, ‘â’, ‘ă’, ‘Î’, ‘ ‘, ‘Ă’, ‘ë’, ‘Ë’);
$replace = array(‘s’, ‘t’, ‘s’, ‘t’, ‘s’, ‘t’, ‘s’, ‘t’, ‘i’, ‘a’, ‘a’, ‘i’, ‘a’, ‘a’, ‘e’, ‘E’);
$str = str_ireplace($search, $replace, strtolower(trim($urlString)));
$str = preg_replace(‘/[^\w\d\-\ ]/’, », $str);
$str = str_replace(‘ ‘, ‘-‘, $str);
return preg_replace(‘/\-{2,}’, ‘-‘, $str);
}
In this tutorial, I will show you how to send multiple non-blocking / asynchronous cURL requests using PHP. Furthermore, I will also show you how to get the output and HTTP response code for each request.
To reset the password for MySQL you first must create a new file with the following contents:
ALTER USER ‘root’@’localhost’ IDENTIFIED BY ‘PASSWORD’;
Where PASSWORD is the new password to be used. Save that file as ~/mysql-pwd.
Next, stop the MySQL daemon with the command:
sudo systemctl stop mysql
With the daemon stopped, issue the command:
sudo mysqld -init-file=~/mysql-pwd
Once your command prompt is returned, restart the MySQL daemon with the command:
sudo systemctl start mysql
You should now be able to log into the MySQL command prompt with the new admin password like so:
mysql -u root -p
When prompted, type the admin password and you’re good to go.
the CSS fonts spec has a couple (new to me) generic font families, like ui-serif and ui-sans-serif, aimed at providing finer-grained controls for specifying OS-level fonts. This allows developers the power to integrate their UIs with the look and feel of the underlying operating system. To suggest Apple user agents render text on screen with the “New York” serif font, developers can specify: font-family: ui-serif.